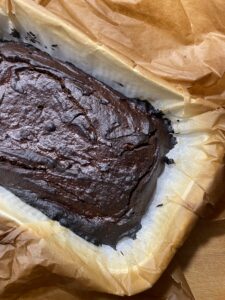
Recipes

Chocolate Truffles

Today I am sharing with you guys a really easy and very delicious recipe: chocolate truffles! They are perfect when you are craving something chocolaty and sweet and they are so convenient if you want to take a snack with you. Also, they are made with real ingredients, so they are the perfect healthy treat. Hope you guys like them as much as I do xx

___________________________________________

//Hoy comparto con vosotros una receta muy fácil y deliciosa: ¡trufas de chocolate! Son perfectas cuando tienes antojo de algo dulce y chocolatoso y son muy prácticas si quieres llevarte un tentempié. Además, están hechas con ingredientes reales, por lo que son el dulce perfecto y saludable. Espero que os gusten tanto como a mí xx


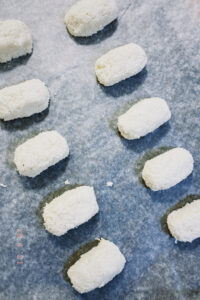
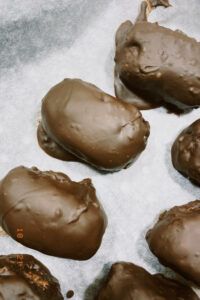
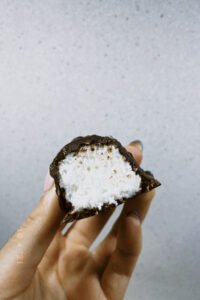
INGREDIENTS (makes around 16 truffles)
10 medjool dates
1 tbsp coconut oil
2 tbsp water
1/4 cup unsweetened cacao powder
1/4 tsp vanilla extract
1 1/2 tbsp cashew butter (or any nut butter)
Pinch of salt
1/2 - 3/4 cup almond flour

STEPS
1. Add pitted dates, melted coconut oil, and water to a food processor(a blender can also work, but not as well). Mix until small bits remain or a paste forms.
2. Add cacao powder, vanilla, cashew butter, and a healthy pinch of salt and blend again to combine.
3. Next add almond flour in 1/4-cup (28 g) measurements until the mixture forms a ball in the food processor. Scrape down sides as needed. You’re going for a sticky energy-bite texture.
4. Scoop out 1-tbsp amounts of the mixture to roll into balls between the palms of your hands. They can stick a little bit if you work slowly, so try not to overhandle them. If too sticky, add a bit of cacao powder to the mixture or your hands.
5. Empty a small amount of cacao powder into a bowl and roll the truffles around to coat. This helps prevent them from sticking and also adds a more intense chocolate flavor.
6. For a firmer truffle, transfer to the freezer/fridge to set for 30 minutes. Store leftover truffles covered in the refrigerator up to 1 week or in the freezer up to 1 month.

_______________________________________________

INGREDIENTES (para unas 16 trufas)
10 dátiles medjool
1 cucharada de aceite de coco
2 cucharadas de agua
1/4 de taza de cacao en polvo sin azúcar 
1/4 de cucharadita de extracto de vainilla
1 1/2 cucharadas de mantequilla de anacardos (o cualquier mantequilla de frutos secos)
Pizca de sal
1/2 – 3/4 de taza de harina de almendras

PASOS
1. Añadir los dátiles deshuesados, el aceite de coco derretido y el agua a un procesador de alimentos (una batidora también puede funcionar, pero no tan bien). Mezclar hasta que queden pequeños trozos o se forme una pasta.
2. Añade el cacao en polvo, la vainilla, la mantequilla de anacardo y una pizca de sal y vuelve a mezclar.
3. A continuación, añadir la harina de almendras en medidas de 1/4 de taza (28 g) hasta que la mezcla forme una bola en el procesador de alimentos. Raspa los lados si es necesario. Se trata de una textura pegajosa de bocado energético.
4. Extrae cantidades de 1 cucharada de la mezcla para hacer bolas entre las palmas de las manos. Pueden pegarse un poco si trabajas lentamente, así que trata de no manipularlas demasiado. Si se pegan demasiado, añade un poco de cacao en polvo a la mezcla o a tus manos.
5. Vierte una pequeña cantidad de cacao en polvo en un bol y haz rodar las trufas para cubrirlas. Esto ayuda a evitar que se peguen y también añade un sabor a chocolate más intenso.
6. Para obtener una trufa más firme, pásala al congelador o a la nevera para que se endurezca durante 30 minutos. Guarde las trufas sobrantes cubiertas en la nevera hasta 1 semana o en el congelador hasta 1 mes.


Homemade Empanadas

Good afternoon guys! Today I am sharing a new recipe that I made this week and turned out pretty good. We had some shortcrust pastry left and we didn't know what to use it for, so I though I could make empanadas even though I never made any. I didn't look up any recipe, I just used my imagination and the ingredients that we had hahahaha. It is very simple, delicious, and something different. I hope you guys try them and like them as much as we did xx 
___________________________________________

//¡Buenas tardes chicos! Hoy comparto una nueva receta que hice esta semana y me salió bastante bien. Nos quedaba masa quebrada y no sabíamos para qué usarla, así que se me ocurrió hacer empanadas aunque nunca he hecho ninguna. No busqué ninguna receta, sólo usé mi imaginación y los ingredientes que teníamos jajajaja. Es muy sencillo, delicioso y algo diferente. Espero que las probéis y os gusten tanto como a nosotros xx


IMG_9364
IMG_9370
IMG_9361
IMG_9373

INGREDIENTS (makes 3 - medium size)
shortcrust pastry
2 boiled eggs and 1 to brush the empanadas
2 onions
1 red pepper
1 can tuna
oregano
rosemary
tomato paste
garlic powder
onion powder
STEPS
1. Preheat the oven at 180C.
2. Chop up the onions and pepper in really small pieces. Meanwhile, boil two eggs.
3. Preheat a pan with some olive oil and place the onions and peppers. Cook until the onions start to get transparent. 
4. Add some water, season with oregano, rosemary, garlic powder, onion powder, and add some tomato paste.
5. Once everything is well mixed, cut the two boiled eggs into little pieces and add them with the tuna into the pan.
6. Add more water or tomato paste if necessary and stir until everything is combined.
7. Roll out the shortcrust pastry and cut into circles. 
8. Start filling the empanadas. Put some filling in one half of each circle and fold them up. Use a fork to seal the edges.
9. Before putting them in the oven brush them with a beaten egg. 
10. Cook for 20-25 minutes until brown and golden. 
11. Let them cool down and enjoy!

___________________________________________

INGREDIENTES (hace 3 – tamaño medio)
masa quebrada
2 huevos cocidos y 1 para pincelar las empanadas
2 cebollas
1 pimiento rojo
1 lata de atún
orégano
romero
salsa de tomate
ajo en polvo
cebolla en polvo

PASOS
1. Precalentar el horno a 180C.
2. Picar la cebolla y el pimiento en trozos muy pequeños. Mientras tanto, cuece dos huevos.
3. Precalentar una sartén con un poco de aceite de oliva y poner las cebollas y los pimientos hasta que las cebollas empiecen a adquirir un color transparente.
4. Añadir un poco de agua, sazonar con orégano, romero, ajo en polvo, cebolla en polvo y añadir un poco de pasta de tomate.
5. Una vez que todo esté bien mezclado, corta los dos huevos cocidos en pedacitos y agrégalos con el atún en la sartén.
6. Añade más agua o salsa de tomate si es necesario y remueve hasta que todo esté bien combinado.
7. Extiende la masa quebrada y córtala en círculos.
8. Empezar a rellenar las empanadas. Pon un poco de relleno en cada mitad de cada círculo y doblalas. Utiliza un tenedor para sellar los bordes.
9. Antes de meterlas en el horno píntalas con un huevo batido.
10. Cocinar durante 20-25 minutos hasta que se doren.
11. Deja que se enfríen y disfruta.

Valentines Day Cookies

Good morning guys! Monday was Valentines Day, so I saw this really cute valentines cookies on Instagram and I decided to make them - found this recipe on @bakesandeats__ Instagram's profile. The cookies were supposed to be quite small and thin, but mines turned out very big and thick as the mixture was a little bit crumbly (bc I think I put too much flour) and I couldn't make them smaller because they would've fallen apart. They didn't turned out as pretty as I would have liked, but they were so good as they had a really buttery taste. If you are looking for a quick, easy, and yummy cookie recipe I would recommend making them - they are so addictive! However, if you are looking for a healthy snack or treat these are definitely not the ones as they are made of plain flour, butter, and sugar. I would say they are a great option if you are having friends over or to take them to a family event or party. I hope you all had a great Valentines Day and spent time with your loved ones xx
___________________________________________
//¡Buenos días chicos! El lunes fue el día de San Valentín, así que vi estas galletas de San Valentín tan bonitas en Instagram y decidí hacerlas - encontré esta receta en el perfil de Instagram de @bakesandeats__. Las galletas debían ser bastante pequeñas y finas, pero las mías resultaron muy grandes y gruesas ya que la mezcla se desmenuzaba un poco (porque creo que puse demasiada harina) y no pude hacerlas más pequeñas. No quedaron tan bonitas como me hubiera gustado, pero estaban muy buenas ya que tenían un sabor muy mantecoso. Si buscas una receta de galletas rápida, fácil y deliciosa, te recomiendo que las hagas, ¡son muy adictivas! Sin embargo, si lo que buscas es una opción más saludable, estas no serían las adecuadas, ya que están hechas de harina, mantequilla y azúcar. Yo diría que son una gran opción para hacer si tienes invitados en casa o para llevarlas a un evento o fiesta familiar. Espero que todos hayáis pasado un buen día de San Valentín y hayáis cuidado a vuestros seres queridos xx


INGREDIENTS
200 gr. butter
1/4 cup powdered sugar
260 gr. flour
jam for the filling
STEPS
1. Preheat the oven at 175C.
2. Mix the butter and sugar together until very creamy and almost doubled in size.
3. Gradually add sifted flour and stir. (I ended up mixing it it with my hands)
4. Scoop onto a baking sheet, make hearts in the center of each cookie and till them with jam (thin layer)
5. Bake the cookies for 14 minutes approximately. (until they they get a golden color)
6. Once cooled down, fill them with more jam.
7. Enjoy!
___________________________________________

INGREDIENTES
200 gr. de mantequilla
1/4 de taza de azúcar en polvo
260 gr. de harina
mermelada para el relleno

PASOS
1. Precalentar el horno a 175C.
2. Mezclar la mantequilla y el azúcar hasta que esté muy cremoso y haya doblado casi de tamaño.
3. Añadir poco a poco la harina tamizada y remover. (Yo acabé mezclándola con las manos)
4. Poner en una bandeja para hornear, hacer corazones en el centro de cada galleta y llenarlos con mermelada (capa fina)
5. Hornear las galletas durante 14 minutos aproximadamente. (hasta que adquieran un color dorado)
6. Una vez frías, rellenarlas con más mermelada.
7. ¡Disfruta!

Vegan Cheesecake

Happy Sunday loves! How are you all today? This week we celebrated my mum's birthday, so we I made a vegan cheesecake for the first time. I got inspired by one of the recipes from @tictacyummy on Instagram, but I changed it a little bit. It is not the best looking cheesecake as the base was almost as thick as the filling, but It turned out really yummy and everybody liked it, so that's good :) Below is the recipe so you guys can recreate it. Have a great rest of your day xx

___________________________________________

//¡Feliz domingo amores! ¿Cómo estáis todos hoy? Esta semana hemos celebrado el cumpleaños de mi madre, así que he hecho por primera vez una tarta de queso vegana. Me inspiré en una de las recetas de @tictacyummy en Instagram, pero la cambié un poco. No es la tarta de queso que mejor se ve ya que la base era casi igual de gruesa que el relleno, pero salió muy rica y a todos les gustó, así que eso es bueno :) Abajo está la receta para que podáis recrearla. Que tengáis un buen día xx


BASE
200gr digestive wheat biscuits
80gr vegan butter or margarine

FILLING
400gr cashews
250ml water
100ml lemon juice
150ml coconut oil
100gr erythritol or any other sweetener
Homemade jam

STEPS
1. Crumble the biscuits, melt the vegan butter or margarine (I used margarine) and add it to the crumbled biscuits to form the base of the cheesecake.
2. Spread the base into a cake pan.
3. Blend all the ingredients but the jam until you get a smooth consistency and pour it on top of the biscuit base.
4. Freeze for 4 hours. 
5. Get any kind of jam that you like. I used a homemade raspberry jam that we had at home, but any jam should work. Spread the jam on top of the cashew layer.
6. Place the cheesecake to the fridge for at least 3 hours to let the middle layer defrost.
7. Enjoy!

  ___________________________________________
BASE
200gr galletas de trigo digestivas
80gr de mantequilla vegana o margarina

RELLENO
400gr de anacardos
250ml de agua
100 ml de zumo de limón
150ml de aceite de coco
100gr de eritritol o cualquier edulcorante
Mermelada casera

PASOS
1. Desmenuzar las galletas, derretir la mantequilla o margarina vegana (yo usé margarina) y añadirla a las galletas desmenuzadas para formar la base de la tarta de queso.
2. Extender la base en un molde para tartas.
3. Triturar todos los ingredientes menos la mermelada hasta conseguir una consistencia homogénea y verterla sobre la base de galletas.
4. Congelar durante 4 horas.
5. Coge cualquier tipo de mermelada que te guste. Yo utilicé una mermelada de frambuesa casera que teníamos en casa, pero cualquier mermelada debería servir. Extender la mermelada sobre la capa de anacardos.
6. Lleva la tarta de queso a la nevera durante al menos 3 horas para que la capa del medio se descongele.
7. ¡Disfruta!

Vegan Bounty Bars

Today I am sharing one of my current go to snacks. It is so simple to make, easy, and perfect for a little treat when you feel like eating something sweet or chocolaty. Growing up I loved Bounty Bars and everything related with coconut, so when I saw this recipe I thought I had to make it. At first, I thought it would be very plain and tough because all you need are 3 ingredients, but they taste just like Bounty Bars and are made with real ingredients!!! I hope you guys try this recipe and like them as much as I do xx


Healthy Brownies

Good morning guys! Today I am in a baking mood, so I decided to make healthy brownies. I found this recipe on Instagram and instead of sugar they use erythritol. When I saw the recipe for the first time I didn't even know what erythritol was, but it is a low- calorie sweetener that replaces sugar. I would say it is similar to stevia. Anyways, it was my first time cooking with this ingredient, and the brownies turned out pretty decent. They are quite thick and not gooey, so if you are looking for a really gooey brownie don't make this recipe, but if you are looking for more of a cake consistency I would give them a try. They are not the best brownies, but definitely a really good healthy option if you are craving some chocolate.
___________________________________________

//¡Buenos días chicos! Hoy tengo ganas de cocinar, así que he decidido hacer brownies saludables. Encontré esta receta en Instagram y en lugar de azúcar utilizan eritritol. Cuando vi la receta por primera vez no sabía ni lo que era el eritritol, pero es un edulcorante bajo en calorías que sustituye al azúcar. Yo diría que es similar a la stevia. Es la primera vez que cocino con este ingrediente, pero los brownies salieron bastante decentes. Son bastante gruesos y no pegajosos, así que si buscas un brownie un poco más líquido no hagas esta receta, pero si buscas una consistencia más parecida a la de un pastel, yo los probaría. No son los mejores brownies, pero definitivamente son una buena opción saludable si tienes antojo de chocolate.


INGREDIENTS
200 gr. dark chocolate
1/4 cup erythritol/stevia/brown sugar
1 1/2 tbsp honey
2 eggs
1 tsp vanilla extract
1/2 cup oat flour
1 tsp cacao powder
Pinch of salt
STEPS
1. Preheat the oven at 350F
2. Melt the chocolate in the microwave and set aside.
3. Whisk the eggs with the vanilla and honey. Add the erythritol and combine.
4. Add the flour and cacao powder and mix together. After, add the melted chocolate and mix again. 
5. Place the mixture into a baking dish and bake for 20 minutes.
6. Enjoy!
___________________________________________

INGREDIENTES
200 gr. de chocolate negro
1/4 de taza de eritritol/estevia/azúcar moreno
1 1/2 cucharadas de miel
2 huevos
1 cucharadita de extracto de vainilla
1/2 taza de harina de avena
1 cucharadita de cacao en polvo
Una pizca de sal

PASOS
1. Precalentar el horno a 350F
2. Derretir el chocolate en el microondas y reservar.
3. Batir los huevos con la vainilla y la miel. Agrega el eritritol y combina.
4. Añadir la harina y el cacao en polvo y mezclar. Después, añadir el chocolate derretido y mezclar de nuevo. 
5. Colocar la mezcla en una fuente de horno y hornear durante 20 minutos.
6. ¡A disfrutar!

Related posts

Gender Equality

This week’s seminar was about gender equality within businesses. To analyze this topic we took a look at a case study about Dior where it

Read More »

Dom Pérignon

Last week was about our presentations of CW1 coursework. In this project, we researched about how the luxury champagne brand Dom Pérignon could implement sustainable

Read More »

MITHILAsmita

During last week’s seminar we had a guest speaker and workshop with Ihitashri Shandiliya, the founder of MITHILAsmita. MITHILAsmita is a social enterprise to preserve

Read More »